It's been the better part of a year since my last post. My "source" for engine parts turned out to be only a "source" of excuses. Finally I gave up and located another source. Theoretically I'll take delivery of my new pistons and rings this week. I'm not holding my breath.
Shortly after the last post I completed the center console brushed aluminum insert. Once I purchase a new radio, it will be located at the top of the insert.
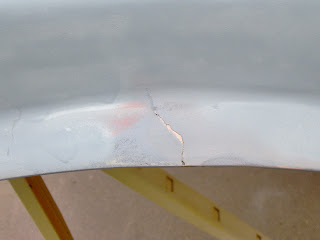
Since then I've been playing off-and-on with the fiberglass bonnet. Looking at it critically for the first time, it has been damaged badly, and on several occasions. The entire nose from the wheel wells forward has been damaged and patched at some point. Most noticeably, there has been a break in the fiberglass between both fenders and the pop-up light wells, and then again between the light wells and the hood opening. This tear had been patched with fiberglass resin, but no fiberglass cloth. Therefore the shape was right, but the structural integrity was left little better than jello. To stiffen things back up, various sizes and thicknesses of metal plates had been pop-riveted through the fiberglass.
Since then I've been playing off-and-on with the fiberglass bonnet. Looking at it critically for the first time, it has been damaged badly, and on several occasions. The entire nose from the wheel wells forward has been damaged and patched at some point. Most noticeably, there has been a break in the fiberglass between both fenders and the pop-up light wells, and then again between the light wells and the hood opening. This tear had been patched with fiberglass resin, but no fiberglass cloth. Therefore the shape was right, but the structural integrity was left little better than jello. To stiffen things back up, various sizes and thicknesses of metal plates had been pop-riveted through the fiberglass.
Step one was to remove the light buckets and all the hardware and get those cleaned up.
 |
Notice Bondo Build-up Below Lamp |
 |
| After Bondo Removal & New Fiberglass |
 |
| After Bondo/ Filler |
Step two was to remove all the bad patchwork:
 |
| Metal plates - Passenger Side |
 |
| Metal Plates - Driver Side |
 |
| Metal Plates - Removed |
Step three was to grind down all the excess resin, recess an area along the tear line, and lay in new fiberglass on the underside of the bonnet.
Step four: grind off all the existing bondo on the top side, create templates of the correct curve on the better side of the nose and build re-shape both sides to match the same contour.
 |
| Bondo Removed - Note Holes from Previous Pop-Rivet "Repairs" |
Step five: recess an area on the topside for new fiberglass patches.
Step six: Bondo.
There are still some more repairs necessary, including some more fiberglass repairs, but it keeps getting closer to whole again. . .


No comments:
Post a Comment
Got a Comment?