Background

Click any photo in a post to enlarge. To leave a comment, click a post's title or post date.

Saturday, November 26, 2011

Way Too Long!

It's been the better part of a year since my last post.  My "source" for engine parts turned out to be only a "source" of excuses.  Finally I gave up and located another source.  Theoretically I'll take delivery of my new pistons and rings this week.  I'm not holding my breath.

Shortly after the last post I completed the center console brushed aluminum insert.  Once I purchase a new radio, it will be located at the top of the insert.

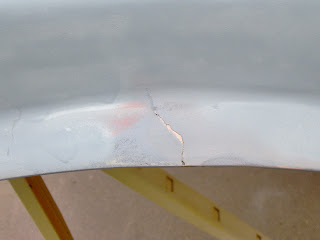
Since then I've been playing off-and-on with the fiberglass bonnet.  Looking at it critically for the first time, it has been damaged badly, and on several occasions.  The entire nose from the wheel wells forward has been damaged and patched at some point.  Most noticeably, there has been a break in the fiberglass between both fenders and the pop-up light wells, and then again between the light wells and the hood opening.  This tear had been patched with fiberglass resin, but no fiberglass cloth.  Therefore the shape was right, but the structural integrity was left little better than jello.  To stiffen things back up, various sizes and thicknesses of metal plates had been pop-riveted through the fiberglass.


Step one was to remove the light buckets and all the hardware and get those cleaned up.
Before
Even the Light Buckets are Broken
Missing/Rusted Hardware

Notice Bondo Build-up Below Lamp
After Bondo Removal & New Fiberglass


After Bondo/ Filler
Restored Hardware


Step two was to remove all the bad patchwork:
Metal plates - Passenger Side

Metal Plates - Driver Side
Metal Plates - Removed

Step three was to grind down all the excess resin, recess an area along the tear line, and lay in new fiberglass on the underside of the bonnet.

Step four:  grind off all the existing bondo on the top side, create templates of the correct curve on the better side of the nose and build re-shape both sides to match the same contour.
Bondo Removed - Note Holes from Previous Pop-Rivet "Repairs"


One side of the lower nose had been inadvertently extended and had to be cut back.


Step five:  recess an area on the topside for new fiberglass patches.
Passenger
Driver - Note Holes from Previous Pop-Rivet "Repairs"
New Fiberglass
Step six:  Bondo.

Steps 7-14 Sand, fill, sand, fill, sand, fill, paint, sand.


There are still some more repairs necessary, including some more fiberglass repairs, but it keeps getting closer  to whole again. . .


Monday, April 4, 2011

Dashing Along

Last weekend a friend came over to help.  We got the dash cleaned up, several bits painted, and I have since got it mounted back on the car.


It may not seem like much from the photos, but the dash work represents a considerable amount of time.  (All of it on my back with my feet in the air and lots of various metal bits poking and scratching every time I shifted my weight).

I've decided to update the look of the dash a little with some brushed aluminum accents.  The gauge cluster was the easy part because all we had to do was sand off the old flaking paint and buff and wax it some.


Thanks to an international Ebay sale I was able to finally replace the rag in my gas line with a real 'petrol' cap.


I have begun the process of installing the A/C system.  The interior unit has been mounted, the drain line set, and (most of) the ductwork run.


The dealer configuration for the A/C replaces the fresh air ductwork.  I wanted to keep the option of both, so I created a 'Y' connection with a flapper valve, so that the air pressure from either fan will prevent most of the airflow from escaping through the other fan system.  (Redneck engineering at it's best: PVC, coat hangers, scraps of a kitty litter lid, and duct tape!)


This is what it looks like installed.

Monday, March 21, 2011

Cleaning Up

Well - after one week the machine shop still thought they could provide the valves.  After two weeks they admitted defeat.  Time to call Jack Lawrence in NY. . .

In the meantime, there is still much to do.  The oil pan had seen some pretty heavy abuse, with several large 1/2" deep dents and a series of deep gouges.


A little pounding, cleaning, filler work, and paint, and it looks (and will drain) a lot better!


The valve covers got similar treatment (sans the filler).


And the hard pipe water hoses. . .


Remember that trip to SA I mentioned last blog?  Well, on a tip there was a parts car in a junk yard, I went down to see what all I could scrounge.  The best find was this:  a factory air conditioning under-dash unit, hoses, bracketry, and controls.  The compressor and radiator were already gone, and the drier kaput, but I've got an idea on how to procure those cheap.  Both of the pulley bearings were also toast and will need replacement.


(and yes, I've already torn down, tested, and reassembled the unit)

Adding the A/C will mean the original cooling fan will not be up to the task, so I cut off the fan bearing shaft, drove in a freeze plug, and gave it the same cleaning and paint treatment as the oil pan and valve covers.
The replacement will be a double electric fan unit strapped to the back of the radiator.


The clutch pressure plate was a pretty rusty mess.


A little disassembly, shows the component parts - all still in good shape under the rust and grime.


Here it is cleaned up and reassembled.


The alternator just took a little cleaning and touch up on the fan/pulley.


I also finally got the trunk paint finished and the gas tank back in the car.  The vibration pads on the straps were gone, so I cut some thick roll roofing in strips, and attached it with spray adhesive to the straps.  A brand new battery went in under the revamped battery hold down bar, and the filler/vent hoses went back on.


Can you tell where I patched the trunk?


( I didn't realize till I downloaded these photos how dirty the car is.  I blew out the garage with a leaf blower yesterday, which made the shop (in general) a lot cleaner, but which apparently left a pretty thick coat of dust in it's wake - Ah well . . .)

A new steel gas line to the front competed the bulk of the fuel system.


FYI:  At the top of the photo you can see a trail of leaking brake fluid.  Apparently the rubber hoses between the fill tank and the master cylinder didn't like being woken from their slumber.  They've been slowly "sweating " for several months and leaked down along the firewall and floor pan.  Although this was unfortunate, it was a great test of the POR paint applied earlier.  You can see the fluid ate off the paint over the seam sealer, but the sealer itself, and the undercoat paint have no lasting damage other than a slight discoloration.  A new topcoat and it'll be good as new again.  If this stuff can handle long exposure to brake fluid, it should stay rust free for a very long time!

Tuesday, March 8, 2011

Parts and Services

It seems like I've been doing a lot of research and purchasing, but not much actual work lately.  I made a special trip down to San Antonio for a special project (more on that later).  I located a clutch disk and new connecting rod and flywheel bolts.

After a little more research, I realized I've been on the wrong track regarding modifying a Sonett engine to run on unleaded fuel.  It's not the pistons, but the valves and valve seats that need to be hardened.  I spent a little over a week trying to source valves and seats, but the best I could find was an offer for bulk parts (cases of 24).  I don't need 6 car's worth, just one!  Luckily I found a machine shop that can source the necessary parts and get the job done.  They are also resurfacing the flywheel.  They should have everything back to me by the weekend.

In the meantime, I've been cleaning up the engine block. . .


. . .and the pistons.  All of the rings are out of spec, but the bore itself is still in good condition and to spec.  The rings on three of the four pistons were glued firmly in place with the goo/carbon deposits mentioned in the last post.  One of them was so bad that the only way to get the compression rings off was to break them into six pieces each.  No confirmation yet, but the same machine shop says they can get me the rings.  If not I have a few other possible sources.

After some tedious work with a very small screwdriver and a light pass with 600 grit sandpaper those ring grooves are ready to receive new rings.


I also disassembled and rebuilt the starter.

Afterward I had it tested, and it fired right up.

The fuel pump is back together. . .


. . .and the water pump housing cleaned and ready to go back on.


. . . As is the thermostat housing.