Background

Click any photo in a post to enlarge. To leave a comment, click a post's title or post date.

Friday, January 29, 2010

Days 43,44

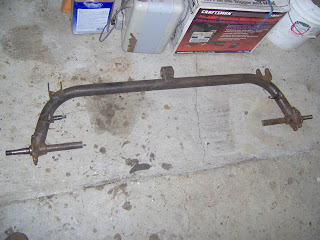
Finally got down to the axle itself in the rear.  Once cleaned off, the main support bushing is in very good shape, so I will forgo the $200 for a replacement.


Rebuilt the master brake cylinder.  The repair kit I received was not quite a perfect set, but had enough of the parts to complete the job.  It contained an extra rubber bushing, and an extra plastic washer, but only one of the thin copper washers (and it has the wrong diameter hole).  The original copper washers were in good shape though, so I was able to re-use them.  There was a lot of petrified gunk in there, but it all cleaned up very nicely.


I had to purchase a punch set and circlip pliers to complete the job.  This was one of the most nerve wracking operations to date, as this is one assembly that is no longer available except as salvaged from another vehicle. I was very relieved that the internal workings had very little rust.  I had half expected to find a bunch of rusted-together parts.  (If you recall, the brakes were not working at all when the car first arrived, and the fluid reservoir was empty.)

I also replaced the seals in the front brake cylinders.  That was also a little touch-and-go as the new parts were a VERY tight fit, and it took a lot of finagling to get them to compress the first time.  Ran them through several cycles using compressed air until I was satisfied they were working correctly.

I have had packages arriving every day this week!  My new shocks are here, as are the rear cylinders and axle limit straps.  (It turns out Volvos of the same time period also used the darn things, and the size is similar enough to work.)

I finally resorted to the big guns and took a pipe wrench to those pesky front wheel bearing nuts.  Even then, I had to jump up and down on the handle several times to break them loose!  Now I need a wheel puller to complete the job.  (Sigh.)
Days 41,42

Cleaned another tub of fasteners and small parts.  These are from the rear brake assemblies.


Also did my first bit of redneck engineering and recreated the straps that hold the emergency brake lines to the rear axle.  (For future reference, an 8" dryer vent is just the right length when cut into strips with a tin snips.)

Monday, January 25, 2010

Days 25-40

Well, it's been a long two weeks since my last post - Many late nights at the office to meet a deadline.  However, lest you think I have not been diligent in my sonett duties, I have opted to work on the car all I can and post less.  Now that the deadline is over you will hear from me more frequently.


Last we spoke (or more acurately that I rattled on) I was working on the radiator.  It still isn't exactly pretty, but this is what it looks like with straightened fins.


Mostly, I have spent the last two weeks wire brushing, sanding, and generally cleaning portions of the suspension and brake assemblies.  Here is a good example of a lower suspension arm before and after.  Note that the bushings have been replaced with new ones.  After the first two I learned that the old ones come out much easier if the assembly is heated with a torch until the rubber starts to smoke, then give it a good whack with a hammer.  Seating the new ones took dish soap, a bench vice, a large socket, and a little more finesse. 


My current dilemma is that for each assembly I need to clean, there are multiple sub-assemblies, so what looks at first like a single large object becomes many small ones.  The other problem is that I am trying to prep enough parts to make it worth while to proceed with de-greasing, rust treatment, and paint.  I still want to remove the front brake disks (need a larger socket) and wire brush the rear axle and transaxles before I do that, so I have had to resort to piles to keep straight what belongs to what.


Here's another angle:


So far the piles consist of : front upper and lower suspension arms, bushing brackets, coil springs, spring rests, shims, and bumpers.  Front brake caliper housings, piston seats, and pistons.  Lower and upper engine mounts.  Rear coil springs, spring rests, bumpers, trailing arms, brake housings, emergency brake levers, emergency brake cables, cover boots, and rear hard brake line sections.  And about a bajillion (that's an automotive term meaning crazy-lots) of bolts, washers, nuts, screws, shims, springs, clamps, and little doohickies.


The front disks and rear drums will all need to be surfaced.  The disks are pitted pretty badly, so I'm hoping there is enough left they don't need to be replaced.  I have already ordered front piston repair kits, new rear cylinders (the old ones were well beyond salvaging), rear brake shoes (the front pads seem to still have a lot of wear left), and shocks all around.  So far the shocks have been the largest cost item.


I have also ordered repair kits for the brake and clutch master cylinders, and clutch slave, and (thinking way ahead) an engine gasket set.  After a long cold spell, it has started to warm some, so the timing seems to be working out well to transition soon to work on the actual subframe cleaning and repair, so I can put all this stuff back together!


Sunday, January 10, 2010

Day 24

Yesterday I pressure-tested the radiator.  At some point in the past, the cooling fan had made contact with it badly enough to punch a large hole in one of the tubes.  To my surprise there were no leaks!  Upon closer inspection, the damaged tube has been cut off on each end and soldered shut.  There are 3 sets of 21 tubes (front, back, and center), so if my math is correct it still operates at about 98% efficiency.  To help it breathe better, though, I am currently in the process of straightening all of the fins (VERY tedious, but rewarding all the same).

This is the radiator before it's rehab.


(FYI :  if you click on the photos you can get a full screen image)  The hole is in the center of the crescent shaped crushed area at bottom center.  If you follow that row to the left you can see where it no longer connects to the vertical reservoir.

Day 23

Took a bunch of the suspension parts out in the driveway and treated with de-greaser and a hose.  Maybe half of the gunk came off.  I have since borrowed a pressure washer and will make another attempt.  I had just moved the stuff back in the garage when I received my first parts delivery - tie rod ends, ball joints, and bushings.  (How's that for timing?)  When I tried to find bushings for the rear suspension, though, I hit a brick wall.  Not even the specialty places carry them.  The trailing arm bushings I could clean up and re-use with confidence, and the main support bushing is still (barely) serviceable.  I really would like to do the job right, though, while all the parts are easy to get to.  I have one more lead I am trying to run down. . .

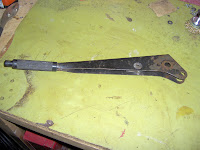
I also cleaned up the emergency brake handle assembly.


(By the way if you are wondering "what's with the ugly green background?", the cabinets and counter tops in my garage are the former casework from the kitchen in my old house.  You'll be seeing a lot of those beauties till I'm done!)

Days 21-22

Worked on cleaning up some small parts.  I decided to start with something non-critical, relatively big and uncomplicated.  My first victim:  the heater fan and enclosure.  There is definately some permanent rust pitting happening here, but it will all be out of site eventually, so although it is nice to pretty it up, the main objective is to remove as much of the rust as possible so I can effectively treat that which is left.  So far I am happy with the results.


The plastic parts and wires came clean with a little mineral spirits and elbow grease.  I also cleaned up some of the sheet metal enclosure pieces.

Based on my success with the heater, I decided to tackle the heater temperature control mechanism which goes with it.  Believe it or not, after a lot of WD 40, scraping, wire brushing, and sanding it does work!


The copper "wire" is actually a tube which acts as some sort of thermostat, overriding the manual controls.  There apparently is a seal on that part of the device that needs replacing, and will need a little more investigation.  Presumably there is supposed to be some sort of liquid inside the tube - but what, and how to get it in there again is a mystery.  To my current thinking, it is not a critical component.  This is what it looks like cleaned up.


(If you look closely, you can make out some of the manufacturer's information.  This piece of the car is British!)

Days 19, 20

Watched black and white movies on TV.  The fact that it was really cold in the shop had nothing to do with it.  Really!

Sunday, January 3, 2010

Day 18

Picked up some coil spring compressors today, and got the front springs and support arms off.  Also got the rear springs, axle, and support bars off.  To do so I also had to free both the emergency brake lines and the brake fluid lines.  The brake fluid lines gave me as much of a workout as any task to date as they fought me the whole way out.  The emergency brake was more a problem-solving exercise.  The lines go along the floor board, under the gas tank baffle, and then under/through a metal bracket welded to the floor pan.  I'm not sure what had them locked up, but I could not get the cables through the welded bracket.  finally had to remove the handle and guard from the grinder to get it into the confined space and grind off the sides of the bracket until I could peel it up with a screwdriver enough to slip the cables through.


Sonetts have a nylon retaining strap that limits the travel on the rear suspension.  I think mine need replacement. . .


Day 17

Lost a day in there somewhere.  Did some research and parts ordering today.  First on the list - rust treatment and preventative paint and suspension rebuild components.  These are pretty basic parts, so I'm using this as a test to see if the parts supplier(s) come through.  If so, I will follow up with some other purchases.


Removed the heater coil assembly today, and some miscellaneous trim.  There was a mouse nest in and under the fan.  A similar nest was also found under the gas tank earlier.


I had put off removing the rubber trim at the rear of the car as long as possible because it was held in place with lots of teeny-tiny screws that I just knew would all be rusted solid and stripped out.  To my great surprise every one came out not only in one piece, but easily and quickly!


Friday, January 1, 2010

Day 15

Wow I'm tired!

Using lessons learned from yesterday, I got the drivers side transaxle / wheel hub assembly off in record time.  With both tie rods off, the rack and pinion and steering column came right out.  After disentangling the starter wire from around the engine, disconnecting the fuel line, and loosening the three motor mounts, it was time to free the powerplant from the chassis.

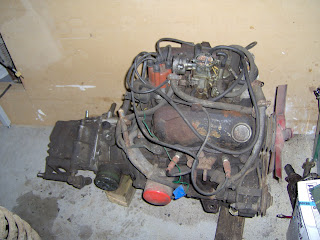
Now when you see the photo below, I know you are going to say to yourself "what the heck is that, and where is the engine hoist?  Is it just that I'm too cheap to rent a hoist or what?"  Yes, and no.  After pondering the matter, it occurred to me that engine hoists are pretty heavy beasts themselves, and sure, I could go pick one up, but how to get it off and back on the pickup?  Solution:  build a temporary A frame out of old deck and playscape parts.  The eyehook is a recycled swing set attachment.  Next problem:  I've got no chains, but I do have a 2 ton rated cable, but it's too long (10').  Solution:  wrap the cable around the engine/transmission three times for the perfect length (I had 2" clearance left when fully elevated).


Once the engine was out, emptying the rest of the engine bay was a snap.  The brake and clutch master cylinders came out first, followed by the gas line back to the fire wall.  The drivers side wheel well baffle and support came out next, and the mounting bracket for the charcoal canister.

Next I moved back into the cabin.  I had to grind off the small screws that held metal plates over the gas line, battery cable, and brake lines because they were so far gone with rust.  Pried out all the little rubber spacers and freed all of these lines.  Working on both sides of the firewall, the heater thermostat came out next, and the rear motor mount hub(the transmission mounts to the back of the fire wall). I removed as much as I could of the emergency brake assembly.  The main pin is stuck.

I also removed the door hinges.  There is a travel limit device tucked into a small hole in the side wall that you must free by removing a 40 year old rusty cotter pin.  Yeah right!  One of the hinge pins ceased, and would not let go, even after 20 minutes of banging and cursing.  Finally had to cut it off.  And last, but not least, I finally figured out how to get the roll bar off, thereby freeing the last bit of apholstery (over the gas tank bulkhead).  The trick was to get the longest socket extension I owned, reach through a small hole and (if the angle is just right) get half a purchase on the nut then turn one click of the ratchet.  Repeat (about 100 times). 

After scraping all the loose rust and crud and vacuuming it is starting to look like I am close to the part of the project I am most excited about - patching the holes!  Basically, the only parts still on the chassis are the remainder of the front and rear suspension.  I need to purchase a coil spring compressor to do that.


Here are some other major parts removed yesterday and this morning:


Day 14

Removed Exhaust system on both sides, and passenger side transaxle and wheel hub assembly.  I had a lot of trouble breaking the tie rod knuckle loose.  This was compounded by the fact that I tried to move forward anyway and disconnected the upper and lower control arm attachments so I had no leverage.  In a fit of frustration, I finally let the whole assembly hang on the tie rod arm and gave the arm a good whack with a hammer and it finally came loose!

Not much to see today, so I'm attaching photos from Days 2-4 of Operation Bicycle.