Background

Click any photo in a post to enlarge. To leave a comment, click a post's title or post date.

Tuesday, November 11, 2014

Cruisin'

Wow!  It's been a while since my last post!  Over two years!

I've done some work since then, but only in very small bits and pieces until the last week or so.

I purchased an electronic ignition module and got it installed.


Of course one of the little posts had to drop down into the distributor requiring the removal of the distributor, turning the engine back over to 6 degrees of dead center, and aligning the distributor again. . .

I also installed a new aftermarket cruise control system.


The system uses a  pulse generator which connects to the speedometer cable.  It is a fairly bulky attachment (+/- 4" long) and I had to shorten the original cable sheath a bit to get it to fit in under the steering gear assembly.  The good news is that it works!  The bad news is that now my speedometer doesn't (apparently the install somehow over-stressed the hairspring).

As a safety feature, the system requires a cut-off switch for both the brake and the clutch.  The brake attaches to existing brake light wires, but the clutch required installation of a new contact switch (above right).


There are not many options for mounting the throttle linkage connection because of the low clearance in under the hood, and the configuration of the throttle linkage arms.  I finally settled on the location shown.  It is relatively unobtrusive, and appears to work well.
Even so, it was very tight getting a nut in between the existing linkage rod seat and the bottom of the radiator overflow strut.


The control module fits nicely in the driver's side bulkhead just in front of the firewall.

The cabin controls replace the original turn signal bar.  I chose this particular model system because it has one of the most convenient and unobtrusive controls.  (unlike the factory AC knobs in the background - that's a separate project coming later. . .)


I also installed my new replacement mirrors:


Sunday, July 15, 2012

Cr@*ck!

The good news is that I've finished all the rear fiberglass repairs. . .


. . . and got it back on the chasis (sort of).


Then there's the bad news, and the really bad news.

The bad news is that the fiberglass body doesn't fit on the metal chasis. 


The passenger side all fits like it's supposed to, but the drivers side (surprise!) is riding too far forward by about 1/2".  It is binding between the metal frame and the body panel at the drivers side rear door pillar.  The rocker length is exactly the same on both sides, and there is the necessary room between the chasis and body panel at the bottom, but the top corner is binding.  I've triple-checked all the measurements, and the fiberglass appears to be the same on both sides.  So apparently the chasis frame is out of whack.  This is not a complete surprise as that area had been mangled and reworked in the past, but I would have expected the result to be too short, not too long.

Oh well . . . It appears that if I take the body back off, cut the metal pillar, and weld it back together, the fiberglass body will slide back into position where it should be.


Which is just as well, I guess, since both mufflers are riding higher than before, and the body needs to be cut back some around them anyway.


The really bad news is that in the process of working on the fiberglass one evening the body jumped off the sawhorses and fell to the floor, cracking the windshield. 


I'm pretty sure spares can be purchased.  I'm pretty sure they're really expensive.  I'm also pretty sure you can't just FedEx those things.  In Texas you can still pass inspection with cracked glass so long as your wipers still work.  So. . . I'm thinking I can progress as-is for now, and once the car is legal again and proven itself around town, I'll need to go on a road trip to pick up a new one.

Sunday, June 17, 2012

Throwin' Glass and Slingin' Putty

This week the repairs on the rear body continue.  First I added a second layer of fiberglass to the layer created last week.  Then, with a solid framework to build on, I began to reshape the exterior of the panel.  I made several templates of the undamaged side to use as a go-by.


As you can see the shape of the panel was considerably different than the other side.


After considerable filler and sanding, it's nearing the correct shape again.


Unfortunately, one of the required adjustments was still structural.  The pillar at the door needed to be cut loose and offset a half inch toward the outside.  This put strain on the newly repaired strut.  So, it needs to be repaired yet again. . .


 Once the lower repair is completed, the aluminum strut can be reattached, and the cause of the problem will finally and permanently be eliminated.


Monday, June 11, 2012

Loosing a Few Pounds


It would seem I've avoided the remaining fiberglass work as long as possible.  The rear of the car has been hidden under a blue tarp in the back yard since the initial demantling several years ago.  It has several of the kind of knicks and tears at the wheel wells and around the muffler cut-outs that one would expect.  It also has stress fractures around the rear hatch hinges and at one rear corner that are due mostly to being a 40 year old peice of fiberglass. However, the portion that consumed my weekend was the drivers side rear fender which (on the surface) doesn't seem too bad.


From the several layers of exposed fiberglass and bondo, and the various shades of primer and paint, it is obvious that there has been major work here in the past, but the shape appears to match the other side of the car and have all the right lines and curves. . .

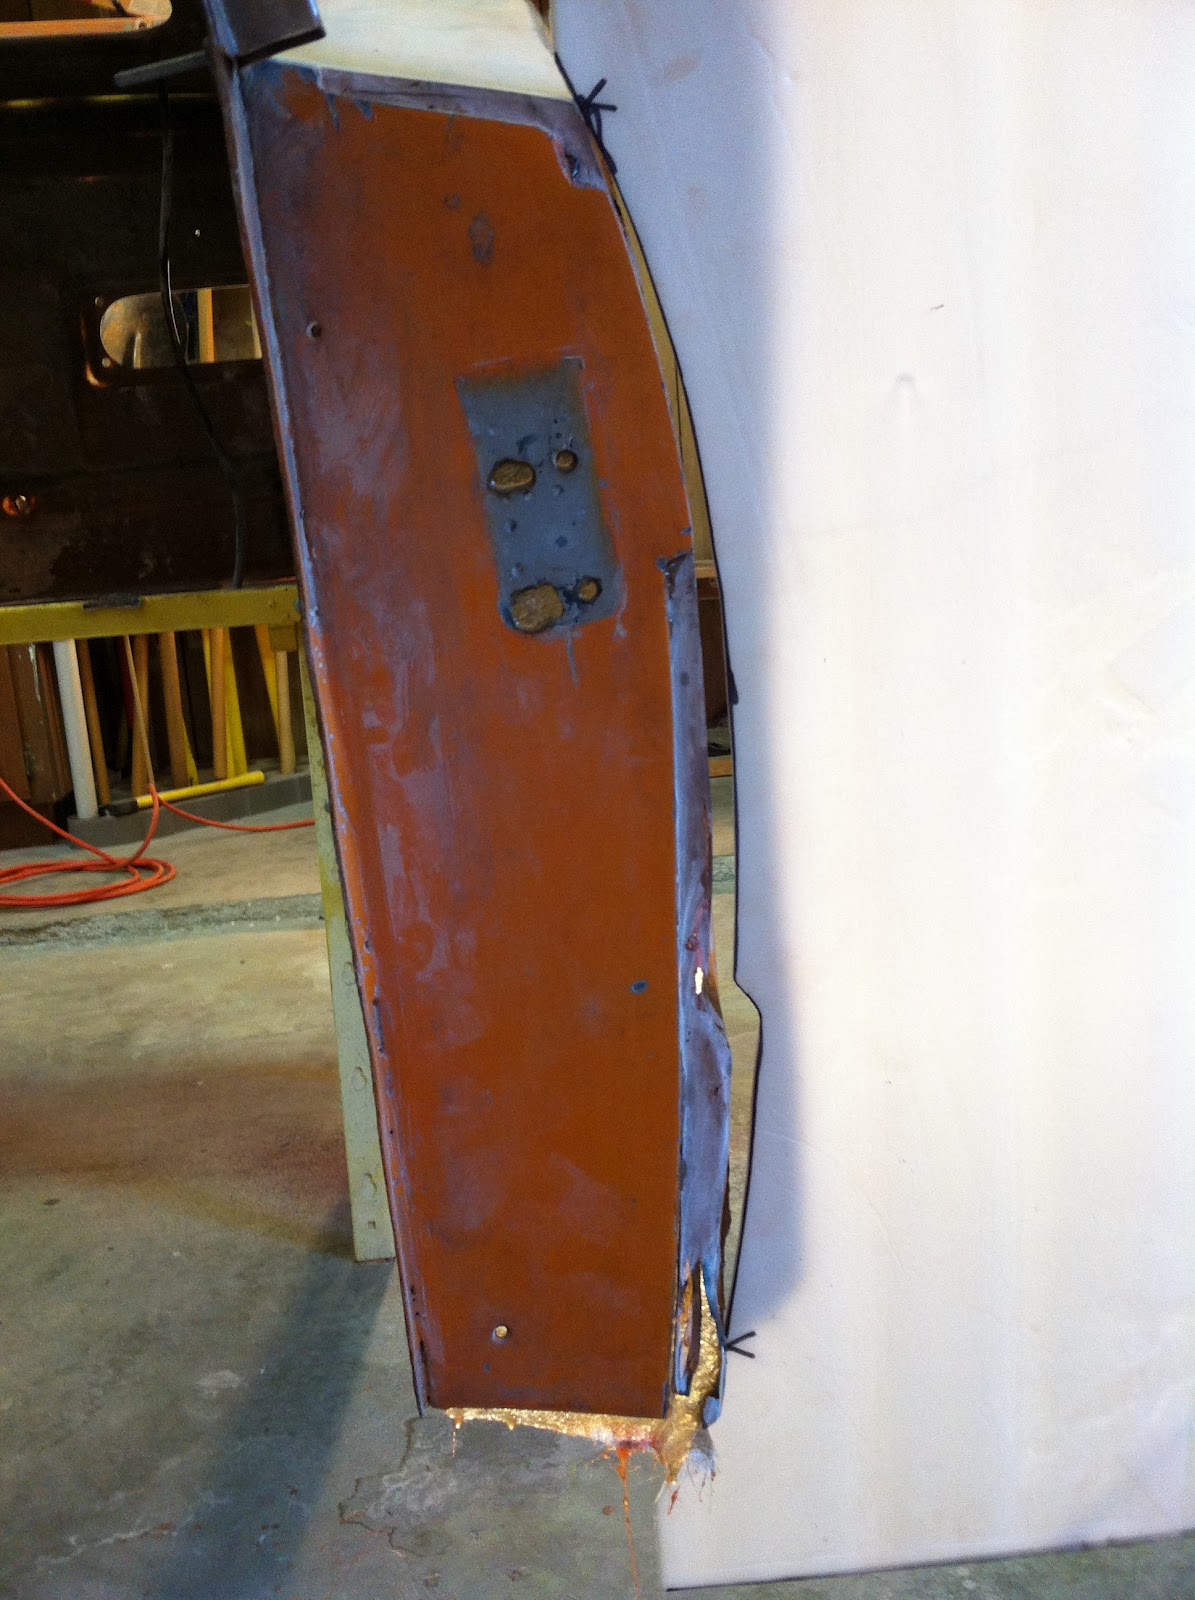
Until you look at the back side of the panel . . .


For comparison, here is the passenger side. 


The black line in each photo is where the metal chasis mates with the fiberglass, and the grey part is that part of the body exposed to the wheel well.  Aside from the various bits of recycled blue plywood, cardboard, and metal riveted, screwed or otherwise attached to the panel in the upper photo, note that there is a very distinct reveal in the lower photo (near the bottom of the panel) that is missing in the upper photo.

Step one was to remove all the bits and appurtances and determine how bad the original break was.  This is where things started to head south.  After excavating approximately 3/8" into the back side of the panel through what was obviously field-applied fiberglass and body filler I encountered this:


Chicken wire! When fully exposed it looked like this:


Over a foot tall and at least that wide again at the top!  The question remained "where is the original fiberglass?"  So I kept grinding. 

I never did find it - which means someone refabricated this entire section of the body from scratch! 

As mentioned before, from the outside it looked accurate, but now knowing what I was seing I started to notice the small differences.  For instance, the reveal around the wheel arch seemed to be a thicker profile (it had to be to compensate for all that additional filler), and the reveal where the door panel overlaps the fender was only half the depth it should have been (no wonder the door wouldn't close!). 

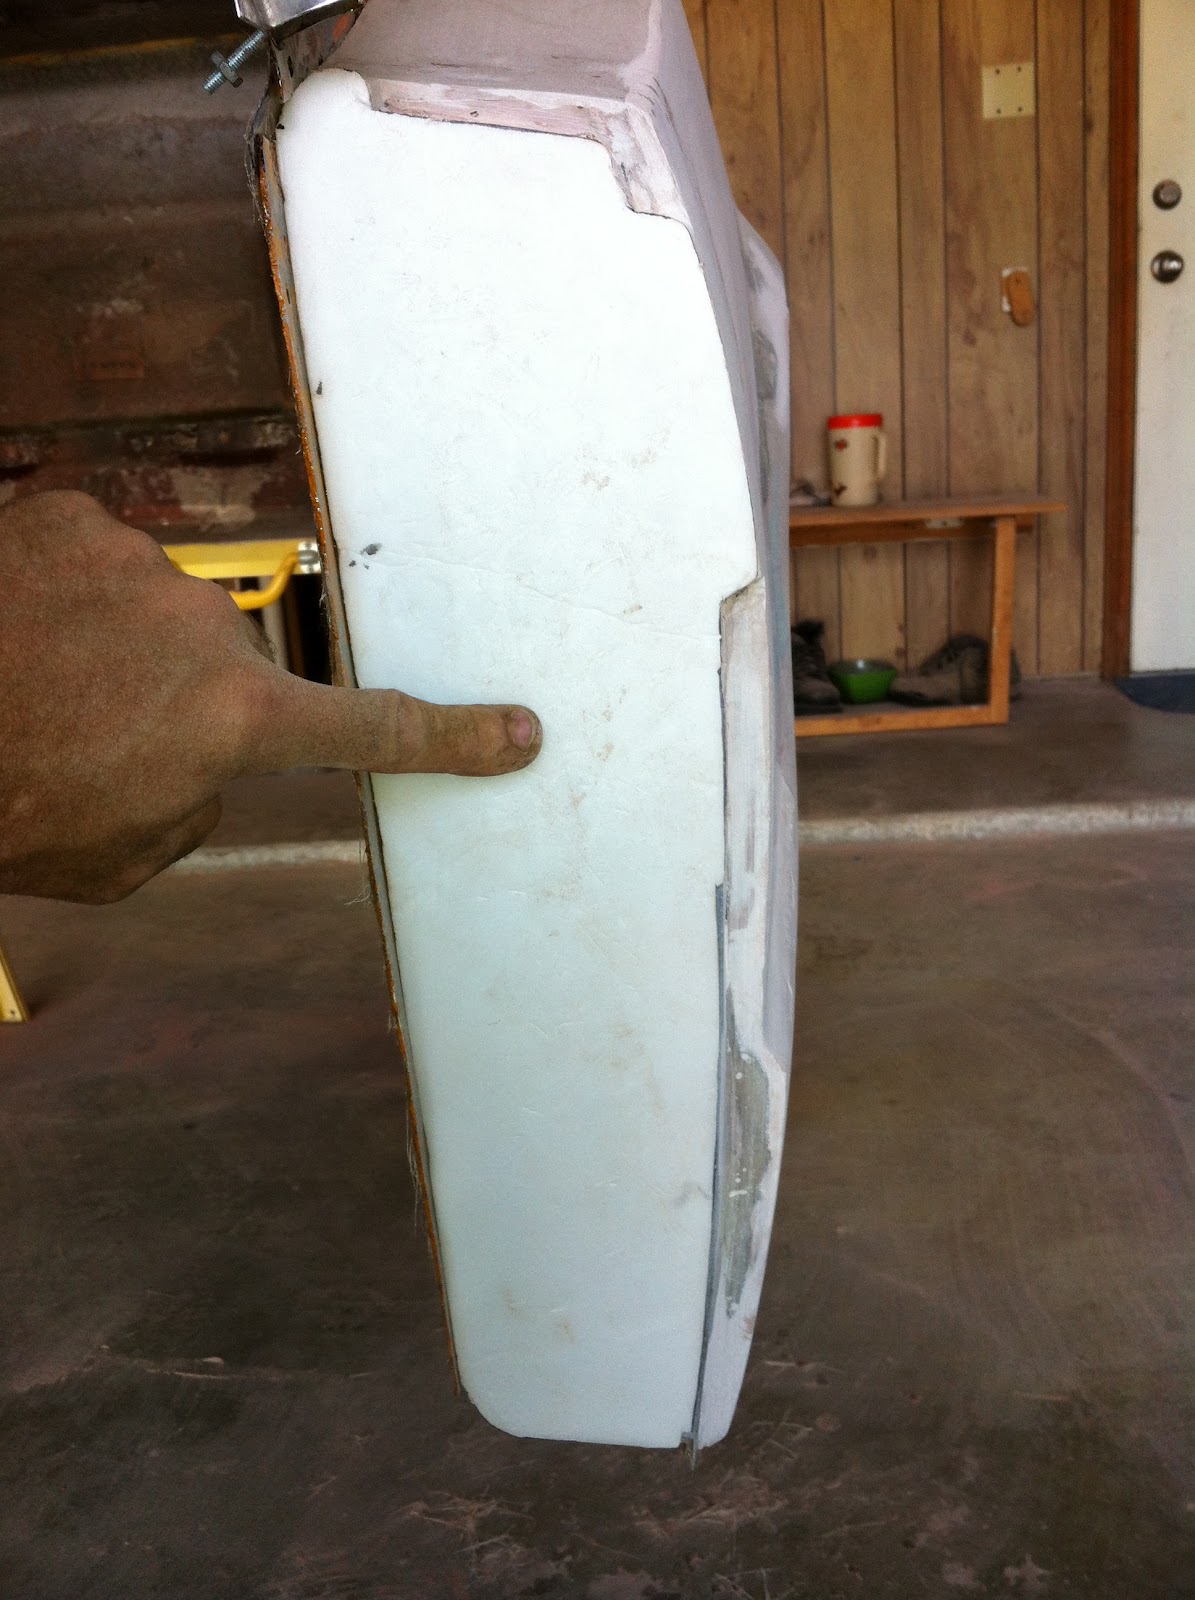
After all the exploratory surgery was done, I ended up with a thin sheet of pure bondo that nevertheless still had roughly the correct shape on the exterior.


These are the piles of stuff that was removed.  (Well most of it.  There's probably that much dust again laying all over my shop now. . .)


This is what it looked like with a new layer of fiberglass installed.  The blue bits are painters tape showing through where my exploratory surgery got a bit too close to the surface or where rivets/screws pulled through from the original repair.  The large blue patch at bottom right is a piece of tape pulling the end cap into the correct position.


Time for a cold beer to give the new work time to set. . .  Which is when I got the second nasty surprise. 

This repair is by far the largest piece I've had to do to date, which means it's the largest batch of resin I've had to mix.  Apparently I got the percentages off by a bit.  Apparently a large bit.  After 4 hours it still was barely setting at all!  A consultation to my favorite search engine provided the consensus that the mix was probably a bit shy on activator, and it would eventually set.
 
Recommendations were to apply heat.  A propane torch appeared to do little except set fire to the surface if held too closely or too long a time in one spot, so that was quickly abandoned.  So (in spite the fact that it's summer, and 90 degrees F outside) I placed a space heater in front of the panel and waited another hour; which had no effect other than to raise the temperature of the shop to about 100 degrees F.  In disgust I closed down the shop for the night.

The next morning, there was still no progress, so I proceeded with sanding the rest of the rear body.  I also patched a structural tear on the same side where the window pillar joins the roof:

Before
After
After much sanding, the car is starting to look an almost uniform color.  (The dark bits are shadow lines).  I've still got some sanding to do at the front drainage tray, at the rear, and of course at the problem area.  I've also still got to patch up all those smaller blemishes noted earlier.  Still, a marked improvement! 


You'll note that the body is now back outside. The last tip for helping stubborn fiberglass resin to set is to expose the piece to direct sunlight where the UV rays can assist the heat in activating the curing process. Would you believe it worked? When I left for work this morning it was as sticky as ever, but when I got home, it was hard and dry!

Sunday, June 3, 2012

Lessons Learned

At this point I'm working toward the goal of making the car road worthy.  In most areas of the country that boils down to a relatively short list of items that must be present and working to pass inspection. 

One category of those things are working headlights, tail lights, stop lights, corner lights, turn signals, flashers, reverse lights, horn, and wipers - in other words a working electrical system.

While the wiring and connections are still (relatively) easy to get to I thought I'd tackle those items.

Of course, in typical fashion, when I started, not a single lamp was burning.  After a full day of sanding and cleaning contacts, checking and replacing bulbs, soldering loose splices, tidying up damaged wiring, replacing a rheostat, checking and rechecking voltage and resistance readings, trying to interpret incomprehensible wiring diagrams, etc.  I finally got all the lights going. 


There are still a few non-inspection items to resolve such as; interior lights (requires a new door contact switch), foot brake warning light (missing specialty warning display bulb, buzzer or modified connections to bypass a buzzer, and adjustment of the switch trip mechanism), antenna and radio connections, and accessory fog light installation.  I also need to replace the headlamps as one has a burned out low beam.

Here's where the lessons learned come in:
  • turn signals (flashers) don't work without a flasher unit
  • if a circuit is mislabeled, it won't ever do what you think it should
  • circuits with stuck switches may appear to be always on, but when you repair the switch unexpected things may happen
  • don't connect your cooling fans to the high beam circuit unless you plan to always drive with your high beams on
  • standard auxiliary lights on a Sonett only come on with the high beams (not sure how useful that is - I think I may change that arrangement)
  • some people will do creative things to avoid fixing electrical problems
  • some people who don't know better will unwittingly create a lot of electrical problems
(By the way, the horn, blower, washer fluid, and wiper circuits were already working; but like all the lights, they can't really be installed until the main body panels go back on.)

Which is a good segue into the next group of inspection items: a cabin sealed from the engine bay and exterior, and the presence of bumpers and mirrors.  For that, I need to finish the fiberglass repairs.  I will also need quite a few different assorted grommets, weatherstripping, and sealant products (which require placing several parts orders).

I uncovered the rear body of the car to take stock of the necessary repairs there (not pretty - more on that next post). 

I also installed new weatherstripping that will fit between the fiberglass body and the chassis.


This weatherstripping was a critical point of failure in the past and led to a lot of damage to the structural steel chassis.  Damaged/missing weatherstripping and poor fiberglass repairs left large gaps open in the wheel wells so that in wet weather water was thrown up by the tires into the interior where it pooled and rusted.

The new weatherstripping has a little bit longer profile to provide a better seal against the fiberglass body.  I will also be prepping the body carefully to ensure a smooth surface exists for the weatherstripping to seal against. 

Monday, May 28, 2012

There she goes!

Now that the exhaust is all sorted, the gas and oil are not threatening to set the engine bay on fire, the fans are operational and will keep the engine from melting itself, and I've figured out why that darn speedometer wouldn't spin, it's time to see if the contraption will actually move under it's own power. . .


(That would be a resounding "yes"!)


So it moves, but what good is a sports car without a good radio?


I had quite an amusing time annoying the young sales clerk at the electronics store.  He kept trying to do a web search in the company computer to figure out what size speakers should be installed in a '71 Saab Sonett.  Strangely, he couldn't find the answer.  He was puzzled that this did not phase me at all. . .

The speakers are not wired, yet, so I'm not sure how it'll sound, but I think the overall look is not too bad.  I suppose I could have searched the web for that one custom radio that would have fit in the available space, but I wanted all the modern conveniences.  Makes for a bit of an asymmetrical installation, but I kind of like the quirkyness of it.  And the available space behind the dash was just the right size.  The aluminum insert is recessed into the dash, but I'm toying with fabricating a second insert (flush mounted) to fit around the right side of the stereo with the same angled edge so the transition is not so abrupt.  Stay tuned. . .


Memories

It's the things you forget that cause the most problems. . .

Take, for instance, the little tidbit of knowledge that when I first removed the engine from the car about 2 1/2 years ago I sheared off one of the rusty exhaust manifold bolts.  All those many months the engine sat there - easily accessible.  And yet, it wasn't till I actually got the engine back in it's mountings, with all the hoses, wires, and other accessories connected again, before this fact was remembered.  At that point, the distance between the bolt and the sidewall was much too small to allow drilling and tapping.  So, after a lot of head scratching and several failed ideas, I finally cut the bolt off flush to the block and welded a new one on.


It's a little quieter with the exhaust on.  Not sure if it actually does anything for reducing noise, but it does transfer the exhaust to the back of the car now, which is nice.  It also contains the flames that were visible coming from the exhaust ports in the video from the last blog.


Then there's the matter of "where did I put the dipstick?".  No telling. I've turned the shop upside down (twice) and it's still AWOL.  I nice man from the web board offered to mail me one.  Should show up sometime this week.  Till then a wine cork seems to be keeping the oil from jumping out the hole.

Then there's that pesky little hole on the top of the fuel pump.  Seemed odd to me when rebuilding the pump that there was a tiny little port into the chamber (no screw, no threads, no plug).  
Funny thing - after setting for several days, the fuel filter was empty and there was air in the line.  
Not so funny thing -when fully pressurized, small sprays of gasoline could be seen falling onto the hot exhaust manifold!  
Got some copper wire and plugged that puppy quick!


And then there's that constant nagging question: "Were those bolts missing when I started, or is there another tub of parts somewhere?"  (I think a quarter of my expenditures to date have been various assorted metric hardware.)  
Case in point - the bolts securing the air filters in place.


Not to be outdone by: "now how did that fit together?"
(Door window operators.)


On the other hand, things you never knew don't seem to be much of a problem:

Like wiring a set of electric fans.