Background

Click any photo in a post to enlarge. To leave a comment, click a post's title or post date.

Monday, February 21, 2011

President's Day

Thanks to the principals at the office for giving me the day off!

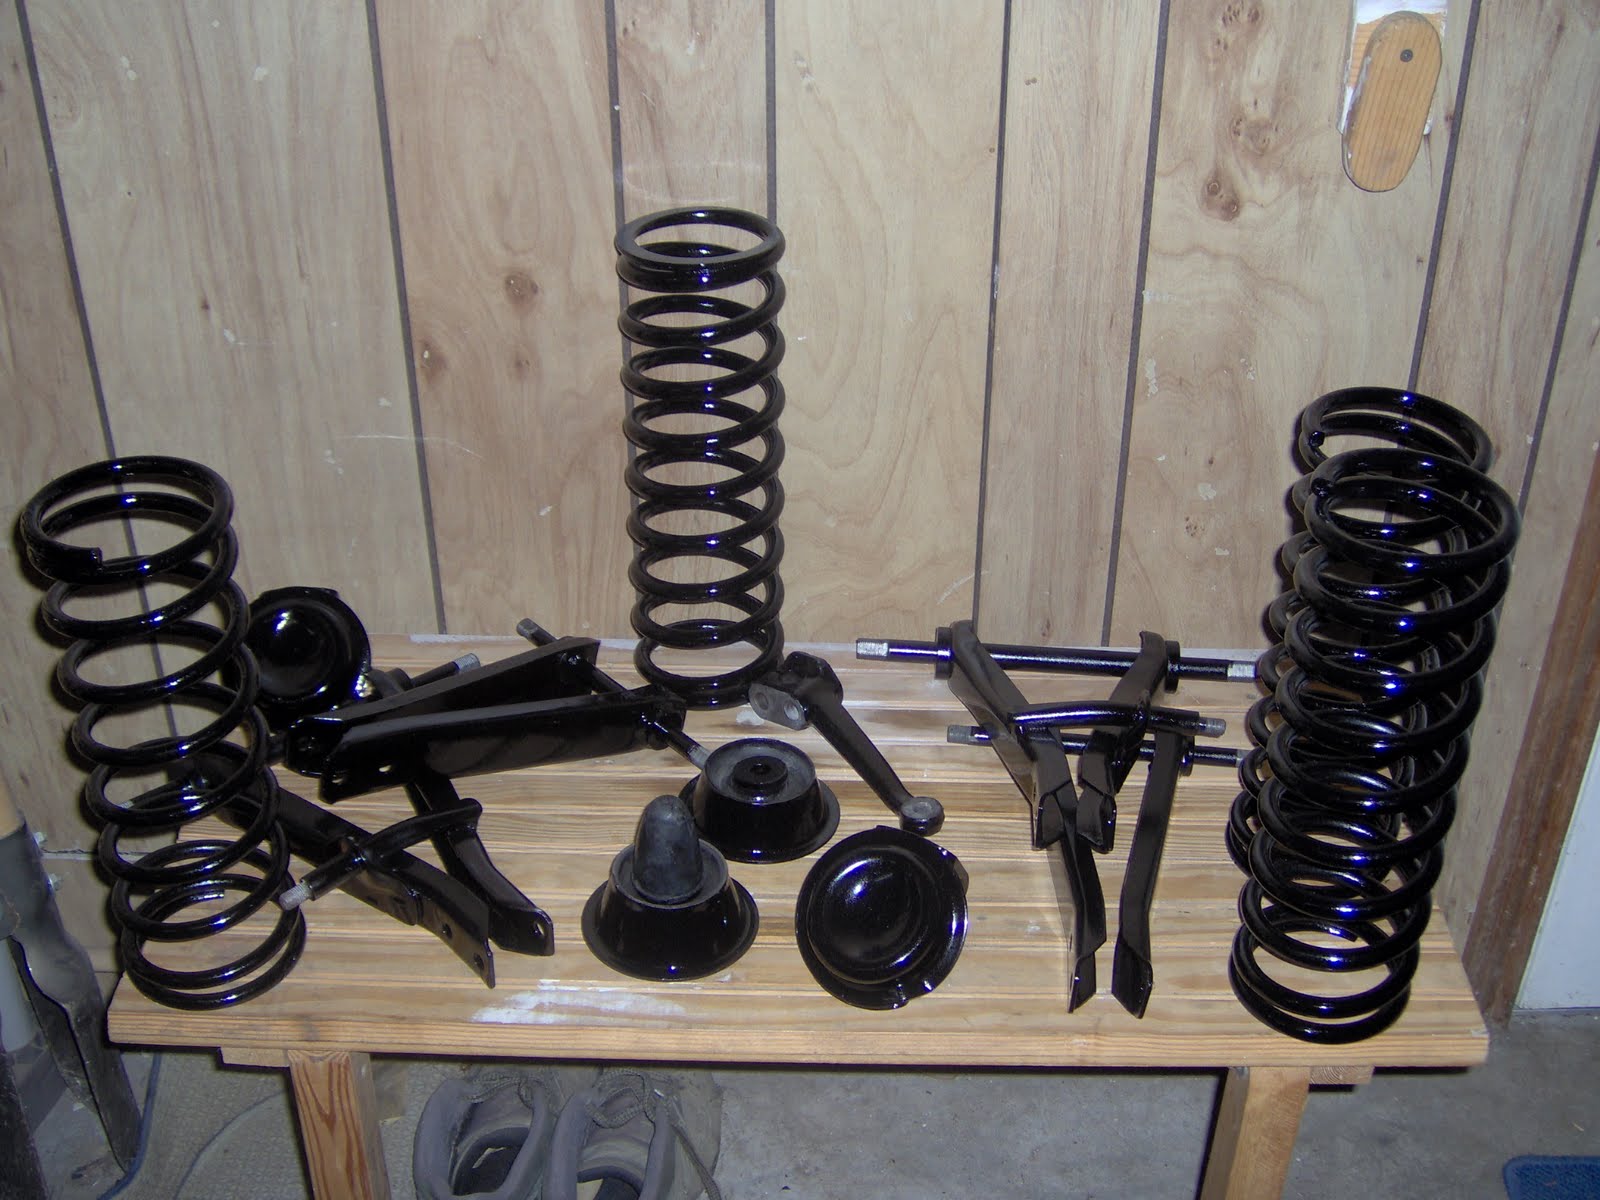
I made good use of it.

I thought I would disassemble the remaining motor accessories: water pump, fuel pump, thermostat housing, etc. It turns out, however, that those components (aside from needing a good bath) are in fine shape.  So I started tearing down the motor itself.

I tested the thermostat, and it appears to be in working order.  The housing has a secondary sensor with vacuum hose connections that I couldn't quite figure out, but it seems to have two ports that are constantly open and a third that opens when hot.

The water pump is little more than a rotary pump blade on a shaft turned by a pulley.  It's made of cast steel, so no problems there.


The fuel pump has some spring loaded assemblies and some moving parts.  The diaphragm was stiff when I first opened it up, but after soaking for several hours has become pliable again.


The clutch plate assembly is in need of some TLC.  The disk has been worn down into the rivets which has cut a groove into the flywheel.  The flywheel will therefore need to be resurfaced.  The pressure plate assembly is very dirty, but has plenty of thickness yet and will restore without too much effort.


My maintenance manual states that you are to turn over the motor to align the distributor cap to the housing before removing the distributor assembly.  As the motor was seized, however, this was an impossibility.  And the distributor was solidly stuck in place.  I attempted to remove the front fan cowling to access the gears, but a breaker bar on the crankshaft only threatened to twist off the gear bolt.  So. . . with a cross of the fingers, and a good yank with a pry bar, out came the distributor - aligned or not.

I was surprised to find that not only the balance shaft gear, but the main crankshaft gear, are are fiber gears!


All of the internal engine parts still had a healthy coat of oil on them, and not a spot of rust to be seen.  The head assemblies, push rods, and tappets are all in great shape, with no visible wear.  The same is true of all three shafts, crankshaft bearing inserts, and other seats.


The same can not be said of the top half of the piston seats, rings, and valves.  There was quite a bit of scale on the head of both the valves and piston heads.  One of the valves has somehow been worn down on one side, and will likely need to be replaced.  All four of the pistons required quite a bit of persuasion to exit their bores.  It appears this was the sole reason the motor would not turn.  The bores themselves are in good shape, just a little built-up scale and goo and lack of lubrication on the rings for about - oh - 25 years.


(Arrow indicates deformed valve.)

All in all, though, I am quite pleased with the condition of the engine.  It has many years/miles left in it still.
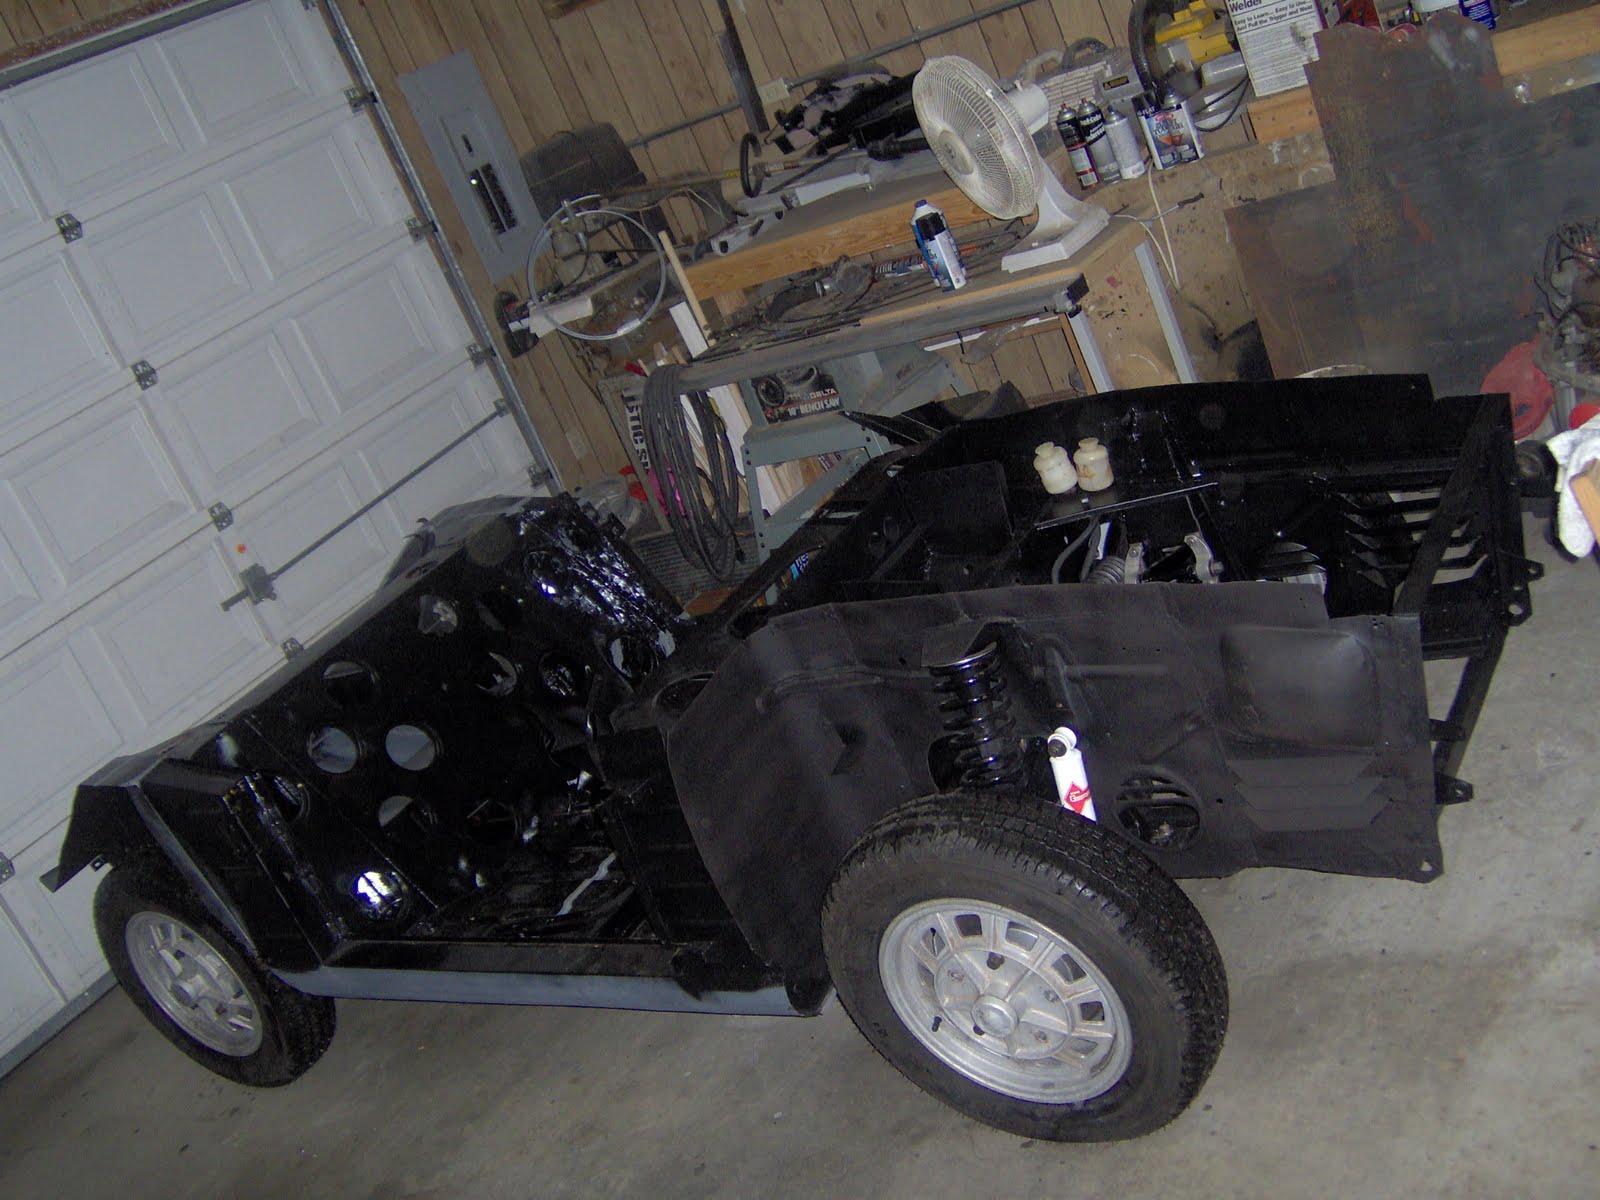
At the end of the day, this is all that was left. . .


Now to find a machine shop to overbore the pistons, and install hardened seats.  I will have the same shop resurface the flywheel.

In the meantime I will research possible replacement of those fiber gears, and track down a clutch disk and a new valve.

Tranny Time!

A gallon of diesel, a half dozen shop rags, and several hours, and the transmission was all cleaned up and ready for reasembly.


I also rebuilt the slave cylinder.  The drain plug (far right in the first photo above) requires a special tool to remove.  So I made one (out of a 3/4" threaded galvanized drain plug - bottom left).


Here's what the cleaned-up tranny looks like assembled.  (I seem to need a little practice not spreading the blue gasket sealant everywhere).


. . . Oh, and yes, I did finish the tile in the bathroom . . .


Wednesday, January 12, 2011

Time Off

What with the holidays, vacation, an office move, and other exciting things it has been so long since I did any major work on the car I doubt anyone is still following this blog.  

As it is, I am still not working on the car as I am finishing up another project first.  I have been remodeling our master bathroom, which my wife seems to think is more of a priority than my work in the shop. . .

Out with the old wallpaper, carpet, tub and surround:


Patch some drywall, build a new shower pan and liner, install some new hardware:


And add some new tile (this is the part I'm still working on):


And throw in some new venetian plaster, lighting fixtures, lav faucets, and flooring for a brand new look:


Over the last few months I have tinkered with a few things, however.  

I removed and rebuilt the carburetor.


And I detached the transmission from the engine and disassembled enough of it to determine that aside from some minor rust on just a few of the gear teeth, and the need for a good cleaning, the transmission is still in good shape (including the freewheel mechanism).


In another couple of weeks, I should be finished with the bathroom, and back to the car.  I plan to check out the condition of the water and fuel pumps next, and then start tearing down the engine itself.

Sunday, September 26, 2010

It's Electric

I am now working at getting all the other systems back in the car in preparation for putting the fiberglass body back on.  First to go back in - the electrical system.  All the under-hood wiring is back in including harness, relays, coil, fuses, etc.  Also back in is the wiper motor and heater fan.  Since a lot of this wiring ultimately connects to the engine there are still a lot of danglies, but she's lookin' good!


At the back of the car, a new hold-down mount for the battery has been fashioned and welded in, and the hold-down assembly cleaned and painted.  A new battery has been purchased, and the main battery lead from the trunk to the hood has been installed.  The main harness to the rear of the car is also back in place including connections to the shifter mechanism and brake pedal.


As you can see, the shift linkage, seatbelt attachment point, and chair rails are all back in place, as are the throttle pedal and linkage, charcoal filter, and bits of the ventilation system.  I've also completed repair, painting, and undercoat of the front wheel "baffles" and metal floorboard trim panels.  The former will go in soon, the latter after the engine is back in and all the systems have been tested and adjusted.

Next up: final prep and paint of the trunk area and fuel system refurbishment and re-installation.


Saturday, September 18, 2010

Rollin, Rollin, Rollin

With the engine bay all sealed up and a couple of coats of enamel on that, it was time to start the re-assembly process.  Step one: get those wheels back on.  That means axles, suspension, shocks, and steering.  The front assemblies went together pretty smoothly.


To complete the assembly, required the steering assembly.  More on that later.

Oddly enough, the rear suspension, which is much less complicated, took more work.  It wasn't exactly easy to fit the four washers, and align the main bushing bolt all whilst lifting the entire rear axle and drum brake assembly above my head.  Then the main bolt kept wanting to strip itself - until it finally occurred to me that I had cleaned the parts so well they were bone dry, without any lubrication.  That big old bolt and nut had enough surface area that the resulting friction was essentially acting to heat weld themselves together.  A little WD-40 and a new universal joint for the socket wrench for better access made a world of difference.

Then I had to figure out those pesky stop straps - how long are they really supposed to be, and how to adjust them?  The originals were both torn, but by fitting the pieces together and backing off the distance specified in my repair manual I had a reasonable guess at the optimum mounting length.  Because I could not find replacement straps for a Saab, I purchased a set designed for a Volvo of the same vintage.  These were slightly shorter and wider than stock, but worked out to have just the length required.  I think the originals deteriorated so badly in part because they were installed too tightly.  Anyway, the result looks pretty secure.


With the new shocks in place, it was time to move on to something new.  While I was focused on the wheels, I figured I'd complete the braking system.  The biggest challenge here was cutting, bending and flaring all the hard lines.  After struggling through half of the lines, my flaring tool broke.  The replacement was much better, and the remaining lines were a breeze (when I remembered to put the fittings on and in the right orientation).

Of course you can't have brakes without a pedal to push!


One of the first projects completed after the disassembly (last spring) was to rebuild the clutch and brake master cylinders, so both were bolted back to the firewall.  With my daughter pumping the pedal, the bleeding process was completed, and the few leaks found eventually sealed successfully.  The car may not go yet, but it can stop!


In the photo above, you can see the master cylinders at bottom right, the steering gears above, and some of the brake lines.

The emergency brakes went in without a hitch.


After several months upside down and up on blocks, it was actually a shock to see the car riding low and beginning to resemble a car again.  (And for my wife to be able to park in the garage again!)


Monday, September 6, 2010

Baby Steps

Well, I missed getting pictures of the seam sealer before the undercoating went on (or the undercoat itself for that matter).  Here's a sample of the finished product though.

All the joints sealed up tightly, a nice, consistent color and texture, and ready (almost) for some reassembly.

Part of the hold-up, once again, was waiting on optimal paint conditions.  I finally got wise, and installed a window AC unit in the garage, so the humidity issues are a thing of the past, and it is a LOT more comfortable in there now!  The special primer went on all the last few loose parts, and then (after a light sanding) a coat of enamel.


While I waited for parts to dry, I got the wheel hubs and rear brake drum assemblies back together.


So far, no major trauma, though the retainer clips for the front brake pistons had me scratching my head for an afternoon.  I also broke off a bolt in one of the rear hub assemblies and had to extract/replace it.  

Now the critical path is to complete the seam sealer work on the topside of the car so the topcoat of paint can go on in the engine bay and trunk.  The interior of the car will all be covered up with carpet, so no need to topcoat in there.  As you can see below, I've already gotten the seams sealed at both sides of the firewall, and am working my way back to the trunk.  The grills are masked off in the engine bay to keep the undercoat on the exterior only.


I am doing a little experiment with the rocker panels.  Because these historically trap moisture, which leads to corrosion, I have drilled a 1/2" hole at each end of the interior side of the rockers - inside the front door pillars, and behind the rear seat baffle.  I'm hoping that if the rockers can "breathe" a little, it will slow the corrosion process when the inevitable moisture gets in there.


Sunday, August 15, 2010

Back to the future?

Now that things are not quite as crazy at the office, I have been making progress again on the car.  She is now bottoms-up again, and has gotten a nice thick coat of the primer on this side.  I have also done a little bondo work to ensure all the little pinholes are closed and it is ready for undercoating.


I have also been masking off around all of the panel seams in preparation for application of the seam sealer.  The original seam sealer seams to have been installed with a piece of old lumber and a broken fork, but I thought I'd tidy it up a bit this time.  The result reminds me a lot of the movie Tron, which has a sequel coming out soon.  Little known fact:  Frank Serafine, the sound effects guru for the movie, put a microphone inside a Saab Sonett engine bay and drove around the Hollywood hills and the resulting engine noises were used throughout the movie.